Skep Replaces the Kitchen Sink
In what seems an impossibility given how alarmingly quickly my sense of time is spiraling away from me, we are just a few months shy of having lived in this house for five years. We had ambitions when we moved in. Rooms, appliances, and fixtures to update, improve, and personalize. A laundry list that would be increasingly ignored as we grew accustomed to our living space and focused more and more on the demands of everyday life.
The garbage disposal was one such item that we spent years simply working around. From the day we bought the house, it never functioned. Flipping the switch to operate the device would only result in a soft hum emanating from beneath the kitchen sink, and even that disappeared eventually. Yes, I did the troubleshooting steps. I pressed the reset button... no such luck. I put an allen wrench in the slot at the bottom; supposedly, you could turn the motor manually to help get it unstuck. I couldn't even budge the thing. It was at this point I determined the garbage disposal was a lost cause.
The easiest option would probably be to just replace the disposal. But neither my wife and I saw the need for one; we weren't in the habit of chucking random waste down our kitchen sink, there's all sorts of limitations on what you're actually supposed to put into them, and they're one of the biggest failure points in the kitchen. Pass.
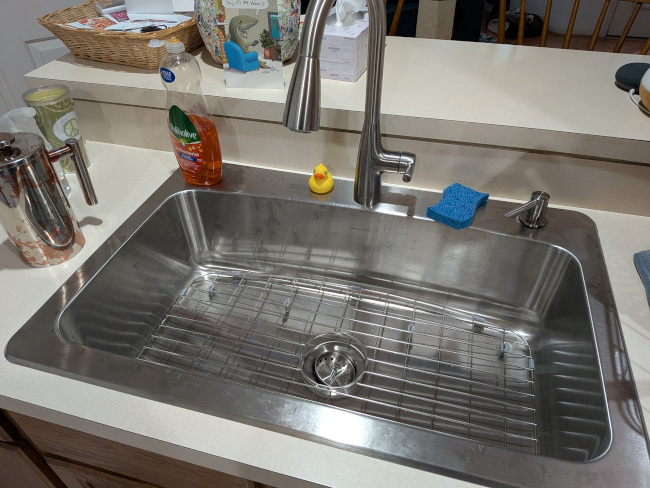
Of course, I can't just take out the garbage disposal and call it a day; I'm going to need to put in new drain piping underneath. And if I already have to do that, then I may as well replace the entire sink and put in one we actually like. Not that the existing sink was bad, per se, but it was a two-bowl sink that we only ever used one side of. Ultimately, this meant we had a tiny little space for washing, which made cleaning our giant crock pot something of a challenge (and we use that sucker all the time). Let's replace the sink, then.
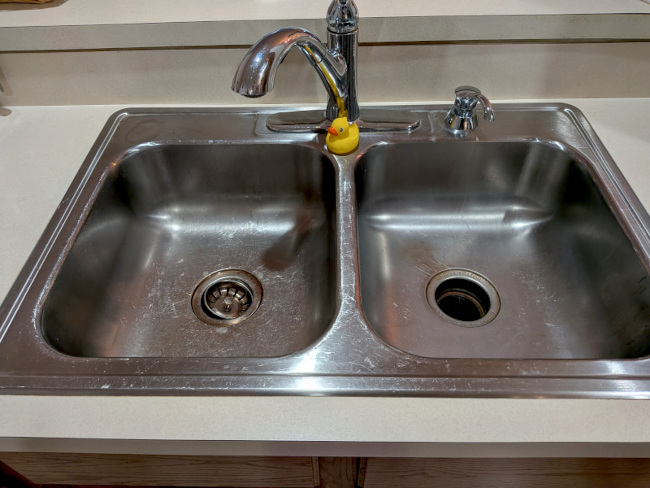
Except now it had become a huge project, so I put it off for a while. That's how you go almost five years dealing with the dishwasher backing up into the sink. Because, oh yeah, the dishwasher drainage actually fed in above the garbage disposal—which of course didn't work, so whatever solids ended up in there weren't able to be ground up, meaning that the drainage was 90% clogged on a good day. Every time we ran the dishwasher, we were rolling the dice on needing to plunge the sink to get the backup to drain out.
My wife justifiably grew tired of this. Since the issue wouldn't resolve until I replaced the sink, and since replacing the sink was my idea, it soon became clear that continuing to drag my feet on doing so would be grounds for divorce. From a long-term perspective, it seemed a poor idea to me to throw away a perfectly good marriage over a garbage disposal, so I set to work.
I did my research. I watched This Old House videos. Replacing a sink was something a person with zero specialized training could feasibly accomplish. You unhooked all the connections, unclipped the old sink, hauled it out, prepped the new sink, slapped it in, clipped it up, reconnected all the plumbing and drainage. This Old House estimated 1-3 hours of work. I'm no dummy; I've learned that you never go by the professional estimates. I figured 5-6 hours would be a more appropriate estimation, though secretly, I was optimistic I could be done in 4.
My first problem arose the night before the big event. I placed a pickup order at Home Depot for some of the supplies I would need, which I often do because it's 5 minutes away from my office and really easy to swing by over my lunch break. It didn't occur to me until much later that I'd spent too much time focused on replacing the sink itself and not enough on the drain plumbing. The first part I put in my cart was the plastic tailpiece that connects straight down under the sink drain; I needed one with a flange for the dishwasher hookup. This piece measured 1½ inches in diameter, which I knew is what I needed because I measured my existing pipes. Then I proceeded to pick out some extra plastic PVC piping and fittings with 1½ inch measurements, so that I could connect this piece up to the existing P-trap piping.
Depending on your level of experience, you will fall into either one of two camps:
- This sounds like a perfectly reasonable series of decisions.
- You have already identified my mistake.
Because I had ordered for pickup, I didn't notice until I got home that evening that the 1½ inch tailpiece was ABSURDLY small for the 1½ inch PVC fittings. Because apparently the tailpiece is called (as I would later learn) "thin wall piping" and is not PVC; actual PVC, meanwhile, measures the interior diameter of the pipe rather than the thicker exterior. Because GOD FORBID two pieces of plumbing sold to 1½ inch specification would fit together.
Which meant the following morning, before I could start this project, I'd have to make the 20-minute run to my nearest Lowes to get the right piping. Annoying, but fine. So I headed over and ended up in the piping aisle. I still didn't exactly see the thin wall piping I'm looking for, and I wasn't clever enough to bring the tailpiece with me to match sizes, but the 1¼ inch PVC seemed about right to my eyes. I picked up some of that.
Of course, when I got home to try it out, the fittings still ended up being too big for the tailpiece. I didn't want to drive back out to Lowes again though, and anyway I figured I might be able to cement it up as best I could and just fill in the gaps with plumber's putty. Besides, I'm tired of waiting. Let's get this sink replaced.
Step 1, after collecting all my tools and supplies and clearing my workspace, is to get rid of the evil broken garbage disposal. The entire reason I'm here. This should feel satisfying.
First, I have to disconnect it from the rest of the drainage. The screw cap at the connection point is jammed on so tightly that my wrench only succeeds in chewing up the grips. In some small act of grace, this is the only one that actually presents a problem through this process, and I can just disconnect further down, closer to the P-trap.
So now I can disconnect the garbage disposal properly. I, uh... didn't actually look up instructions on how to do this. I sort of figured it would be self-explanatory. Anyway I could see a bunch of screws at the top. Seemed like a good place to start!
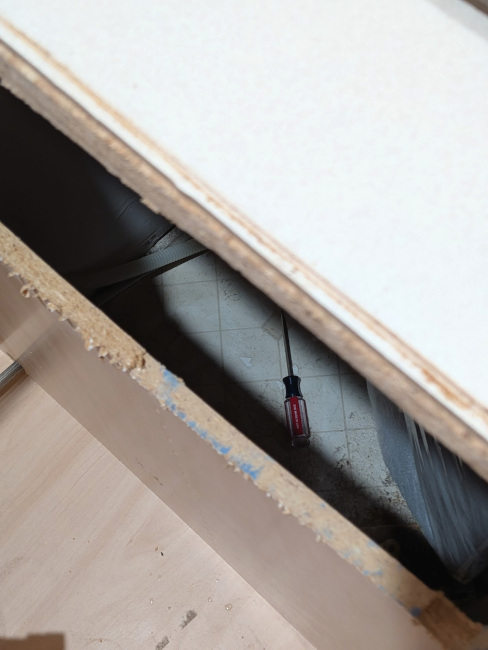
...It was not a good place to start, because unscrewing them didn't do anything productive. I could spin the disposal in place around the sink opening now, but that was it. Now I decided it was a good time to look up instructions. It wasn't actually the screws I needed to go after, because these just secured the part that held up the disposal to the sink. Instead, I needed to stick something in these horizontal metal loops to "twist" the disposal off of this holding piece.
Except, like everything else under this blasted sink, this connector didn't want to budge. Part of this was because the disposal was now no longer locked in place, so I had to redo those screws I undid, which was more of a pain in the ass than you think. In the image it looks like they take a flat head screwdriver, but the bulk of the disposal gets in the way of the screwdriver; to actually secure them, you need to fit an allen wrench in there, and those screw heads wouldn't hold an allen wrench to save their lives.
Even when that top part was secured tight again, it still took several minutes, every ounce of my strength, and my thickest allen wrench (I guarantee I'd be shit out of luck if I had to rely on a standard IKEA-strength wrench) to finally twist off the disposal. I admit that chucking that guy in the trash was pretty satisfying, but at this point I was wiped and we're already nearly an hour and half in. And this was just the first step.
Next, I have to turn the water off so I can disconnect the faucet. Ideally, we'd just shut off the water under the sink, but the current range of the hot water valve is half a turn total, and I can't take a wrench to it because the grip is the cheapest plastic you've ever seen, so I have to shut off water to the whole house (I did know about this because I had to replace the water control cartridge in the existing faucet to fix a leak about four years ago. That faucet was starting to get leaky again. These cartridges are a racket). When I go to unscrew the faucet from underneath, I find that—say it with me—one of the screws won't turn. I decide I don't actually need to take the faucet off.
Next up, I have to remove all these little clips around the edge of the sink that are holding it up flush against the counter. In doing my research for this project, I came to understand this was going to be a huge goddamn pain in the ass, because the builders who put this kitchen together cocked it up.
See, my existing sink measured 33x22 inches, which is a standard size. I should be able to get a sink that matches those dimensions and drop it in the same space, no problem. But while I'm shopping, I keep seeing a specification show up: minimum cabinet width; and for all the sinks I'm looking at, they all say 36 inches. I didn't know what this meant, so I looked it up. Basically, although the sink is 33 inches wide, you ideally want the cabinet a little wider underneath, because you need room for the clips and the inner cabinet wall is going to eat up some of the available space. I figured, I should probably check this.
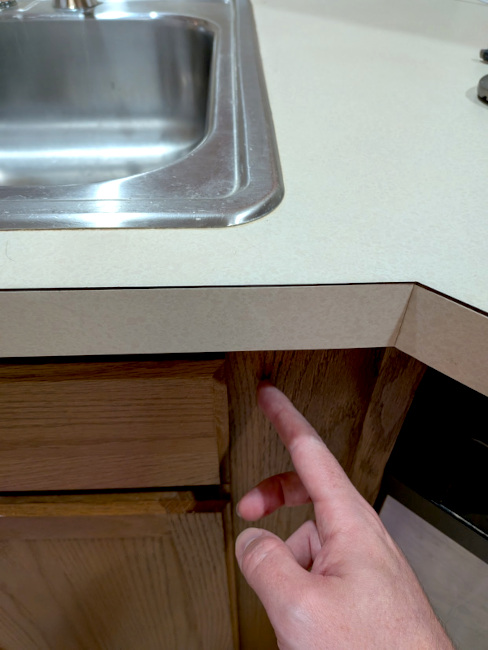
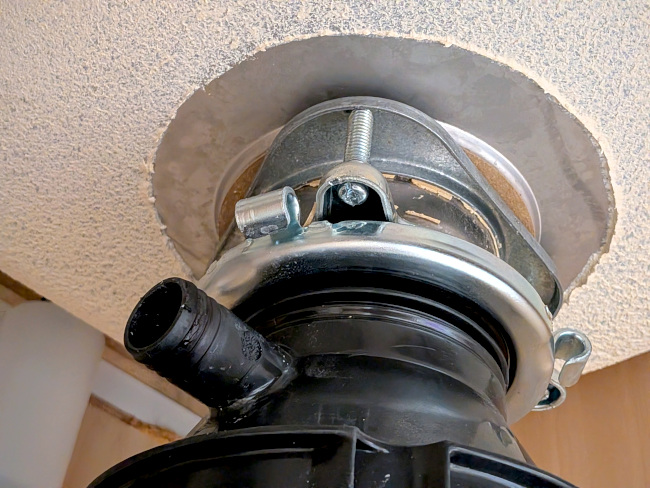
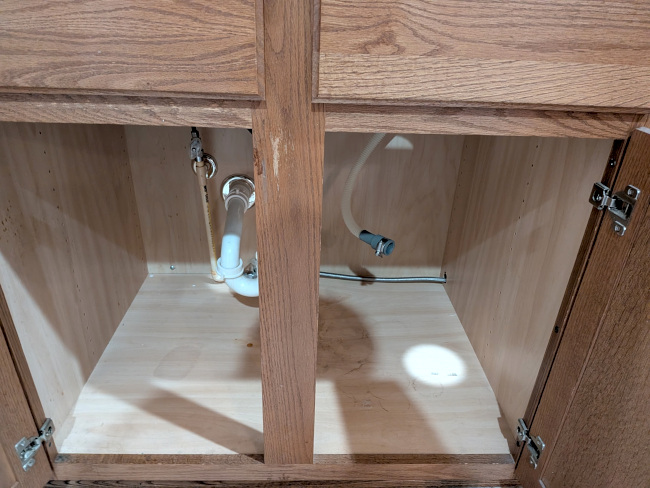
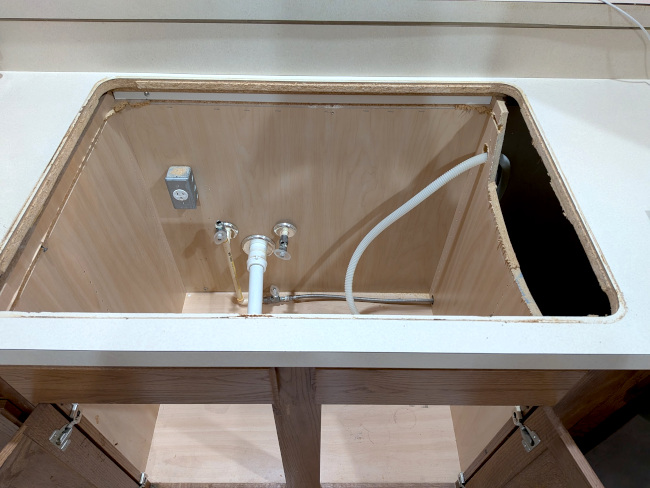
Turns out, my cabinets are 33 inches wide. Really, I ought to have a sink that's 3 inches shorter, except because the counter is already cut out for a 33-inch sink, a 30-inch would now be too small. The builders "justified" this because this cabinet connects to the next at a 135° angle, and the next spot over is where the dishwasher sits, so there's actually a few inches of empty space between the sink cabinet and the dishwasher. The inner cabinet walls don't technically reach all the way up to the countertop, and the bastards probably just attached the sink before they put the counters in place and lowered everything in as one piece. So here's how that looks from underneath:
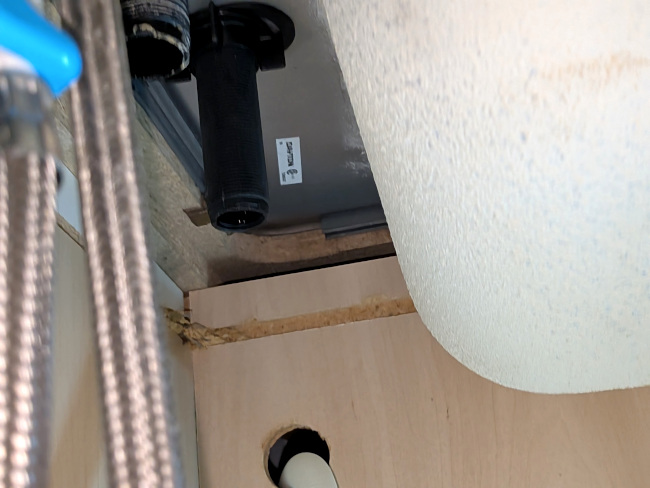
This ended up being one of the major factors in determining what sink we actually ended up picking. Namely: one with as big a gap between the edge of the sink and the bowl of the sink as possible. Because that sink bowl was going to be jammed right up against that cabinet wall, I knew I would need as much space as I could get to reach those dang clips. Now that I was actually disassembling the sink, my biggest hope was that the construction of the house was done so cheaply that the installers had neglected to clip that side of the sink whatsoever. This was a very realistic hope, mind you; I am 100% certain that the design theory behind this housing development twenty-odd years ago was: the houses need to be cheap to attract elderly folks, and only have to hold together until the owners die off.
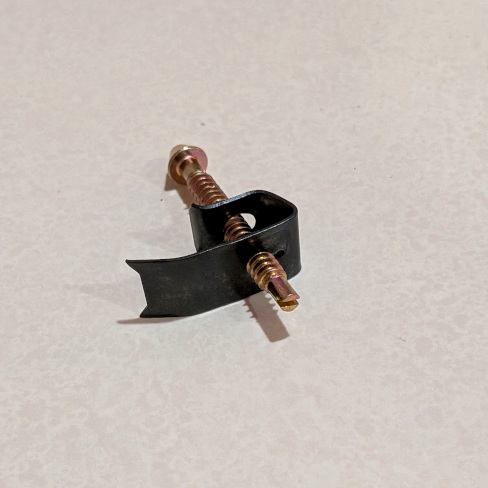
First, I undid all of the other clips (which involved reaching up with a flathead screwdriver into what was essentially a screw with the slot cut into the flat bottom instead of the head, which sat in a U-channel on the underside of the sink and held the clip up) and tried to pull the sink out. Unfortunately, it was obvious there were some clips in place on the difficult side, so they would have to come off. Checking again, I spotted one of the clips entirely blocked off by the bowl of the sink. There was no way to fit my hand or any sort of tool up through the tight, angling space and untwist a headless screw. My options were extremely limited.
So, I had to saw out part of the cabinet wall.
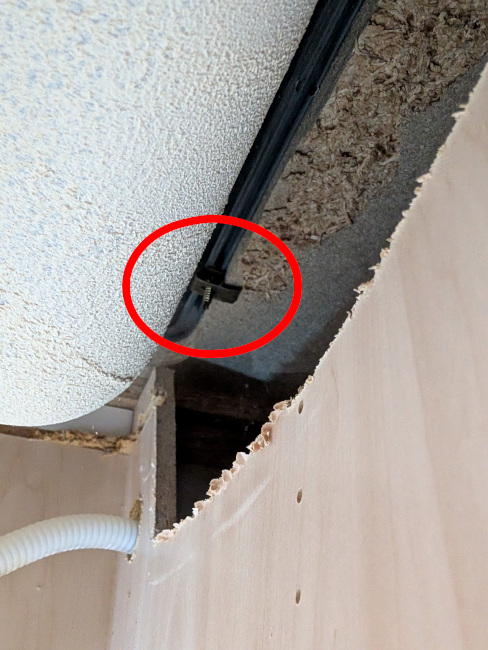
This was pretty much only possible because about a year ago I backed a cordless hand drill on Kickstarter which had something like a dozen or so different attachments, and I received it maybe four months ago. One of those attachments was a saber saw. Fantastic investment so far. Don't know how I would have done this otherwise.
Anyway, after cleaning up all the sawdust I generated, I unscrewed the final clips without major incident.
After retrieving my screwdriver with the only tool I could conceivably think to use to reach it (a branch cutter with extendable arms), I could at last, finally, remove the old sink.
At this point, I'd been working for around 4 hours. You may remember that this was my optimistic estimate for completion time, and already over the worst-case estimate offered by This Old House. I was only halfway done. I decided I needed a lunch break.


After lunch, it was time to unbox the new sink and start installation, more or less in reverse order. The guy on This Old House made a comment about making this part a little easier by installing the new faucet before putting the sink in place; this was fairly uneventful, as was laying down a bead of silicon, although thinking about it now I was probably supposed to put that right on the countertop and not around the inside edge of the sink. Ah I'm sure it'll be fine.
Then I had to put the new clips on. This was much harder than taking them off, because
- a) I needed to thread the "head" of the screws through the U-channel I mentioned earlier, except this deeper sink bowl meant it was really hard to reach up there. I ended up having to hold the bottom of the screw in a pair of pliers and guide the head into place.
- b) The clips weren't secured to anything, so holding them in place as I twisted in the loose screws was a nightmare.
- c) Wedging myself into the cabinets and reaching upwards was growing increasingly exhausting at this point.
This took so long that despite being supine throughout the process, the back of my knee started to cramp up. Meanwhile, I'm just getting increasingly tired and agitated. As far as the physical demands of the project went, this was definitely the hardest part.
But at this point, I could hook the faucet back up to the water supply and turn the water back on. Now at roughly the 7-hour mark (including lunch), there was only one thing left to do: assemble the drain piping.
So, I realized I had a bit of a problem, which was that I didn't really have a good way to attach the 1¼ inch PVC I bought this morning to the existing P-trap piping. I ended up attempting to reuse as many bits of the pipe work I'd taken out earlier rather than the stuff I bought, simply because it was the right size and thus easier to connect everything together (also, during this process, I discovered that one of the previous occupants had managed to lose a plastic knife down the sink drain, where it must have been wedged for years). I measured my tubes, then took up my saber saw attachment and cut pipes down to size. Still, between what I could salvage and the tailpiece connected to the drain, I didn't have quite enough to complete the drain. But I was close. All I needed was a single elbow joint fitting to connect the tailpiece to the rest of the piping. If I could get that, I'd be golden.
Looking at my options, I was growing less confident about the 1¼ inch fittings I'd bought and the "fill the gaps with putty" strategy I'd devised that morning. What if I bought a smaller fitting...?
I'm nearing hour 9 now. The end is in sight, and I am desperate to reach it. I looked up the ACE Hardware store three minutes from my house, and found they had a 1-inch PVC elbow joint (which, to be fair, I did check them for piping before I went to Lowes, but I was directed to another location a half-hour away. Dunno why they have the fittings and not the piping, but all right). Hell with it, what's the worst that could happen at this point.
I return with the fitting, and......
...it's too small. It won't fit my pipes.
At this point, I am exhausted and frustrated and, above all, just plain confused as to why I can't find any pipes or fittings that match what is under my sink—or, for that matter, match the damn tailpiece I just bought. But I'm not going back out to the store tonight. I guess we'll try the putty method after all, because what other option do I have.
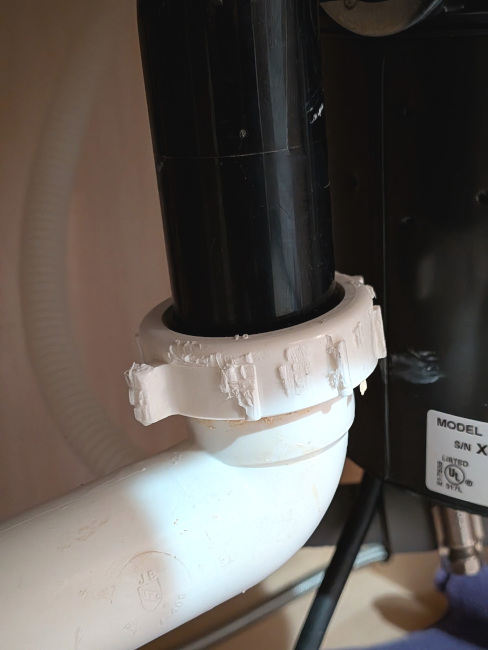
Essentially, this amounts to plugging an elbow fitting with two pipes that are too small for it, and filling the gaps with Play-doh. Of course it was never going to work, and I was a fool for expecting it to, though it was desperation that drove me to such extremes. It wasn't a complete disaster; when I ran the faucet, it held most of the water. But there were still some drips from the fitting, as well as from a couple of the other screw-on connectors; and when it comes to plumbing, any drip is too many drips.
I was done. 10 hours in, and I was so completely and utterly defeated by this damn sink and its damn piping. I wanted to call it a night.
The time was now 7 pm. My wife had arrived home from work around 6:30 or so to find me at my wits' end, and witnessed my final hopeless attempt to complete my objective. I'll never know whether it was out of pity or frustration at my masculine inability to ask somebody at the store for help, but she offered to run to Lowes to get the right piece. I told her that she shouldn't, but I also wouldn't stop her. She went. I stayed home, felt miserable, and did dishes in a sink with a leaky drain.
She called me up, saying the person she talked to suggested a flexible piece of piping, perfectly sized, with rubber gaskets and connectors on each end. I was optimistic, but a little skeptical, since the pipe work I had in place already had a connector on one side. I asked if it would still work. She was annoyed, but went to ask the employee, who said it would work. Satisfied, she returned home.
The employee must have been wrong, because there wasn't a way to connect a connector to a connector. Of course that's silly. Realizing this, I remembered that, amidst all my cutting, I ended up with a small piece of piping we could use as a fill-in between connectors; but no matter what we tried, the connections were still leaking, the pipes didn't seem to be holding in place, and we began to doubt that we were using the gaskets correctly. After the whole thing fell apart on us, she became just as despondent as I was, as we were far worse off than we were an hour ago. We called it an early night and went to bed.
I was sore the next morning. My entire body ached. My sides hurt when my wife hugged me. It hurt when I sat down. Hell, even my fingers were sore.
But my mind was refreshed, at least, and I took some time to sit down and re-evaluate my problem. The Lowes employee from the previous evening had come through for us in one small way: they were the first to use the "thin wall" terminology for the piping I needed, and were my indicator that PVC just wasn't what I was looking for. I looked up some videos. I found that we had been using the gaskets correctly, but in my state of fatigue, I'd entirely forgotten that you can't just hand-tighten those connectors; you need to take a wrench to them to make sure they're sealed. Er... oops. Plus a little teflon tape over the threads wouldn't hurt, either.
One more trip to Lowes, and I finally found the parts I needed. In my defense, they weren't in the aisle with the piping; they were two rows down, in an aisle labeled "Plumbing Repair". And you couldn't just buy a length of this thin wall piping; you had to buy it in sizes no more than 8 inches, always with some sort of flared end or threaded connector that makes you think "okay, but where's the regular-ass pipe".
I bought my elbow joint and a few more pieces to be safe, took them home, and put them together properly this time. It took a couple rounds of running the faucet and tightening connectors where there were still slow leaks, but after another hour or so, everything finally stayed dry.
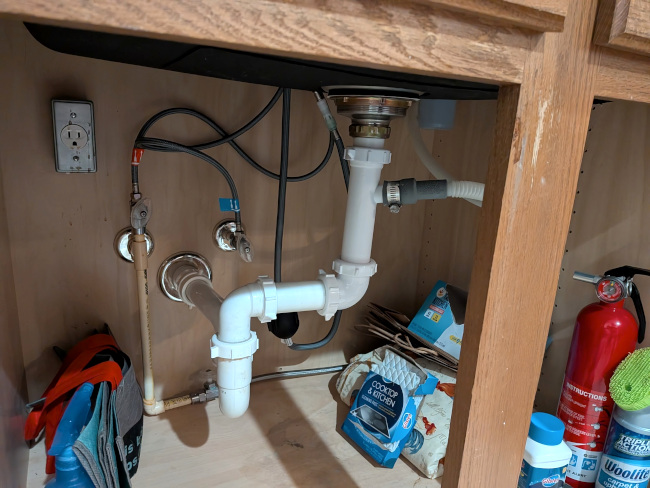
Even though it's been over a day since I've finished, and we've used the sink plenty of times, I'm still checking the cabinet underneath to make sure there hasn't been any dripping. I feel like my paranoia is a little justified at this point, but perhaps it's time to accept that I did it. I'm actually done. I installed a brand new goddamn kitchen sink.
And I'm never fucking doing it again.